How to deliver a reader magnet with beehiiv
· 5 min read
beehiiv started as a newsletter platform and has become popular with authors who write a regular newsletter for readers. This guide connects it to Storyfinch so every reader who picks up your free book is added to your beehiiv publication.
beehiiv needs two things from you rather than one, an API key and your publication ID, and it handles welcome emails a little differently from other services, so it is worth reading step 5 before you start.
What you need
- A beehiiv account. API access is available on every plan, including Free, but beehiiv asks you to complete its identity verification before it switches API access on.
- Your reader magnet as an EPUB, a PDF, or both, plus a cover image.
- Storyfinch Pro for the automatic connection. On the free plan you can download your new readers as a spreadsheet and import them into beehiiv yourself.
How beehiiv organises subscribers
beehiiv does not have separate lists. Subscribers belong to a publication (your newsletter), so when you connect beehiiv to Storyfinch, readers are added to the publication as a whole. If you run more than one publication, for example one per pen name, add a separate connection for each.
Step 1: Create an API key
- In beehiiv, scroll down the left-hand menu to Settings.
- Under Workspace Settings, choose API.
- Click Create New API Key and give it a name you will recognise, such as "Storyfinch".
- Copy the key. beehiiv only shows it once, so save it somewhere safe before you confirm.
Step 2: Copy your publication ID
On the same API settings page, find the Publication ID section and copy the ID. It starts with pub_. If you have more than one publication, use the arrows next to it to pick the right one.
Step 3: Connect beehiiv in Storyfinch
In Storyfinch, open Integrations, choose beehiiv, and add a connection. Give it a name (your pen name works well), paste the API key, and paste the publication ID. If you want new readers to get beehiiv's welcome email, tick Send beehiiv’s welcome email to new readers (more on this in step 5). Storyfinch checks your details straight away and stores the key encrypted.
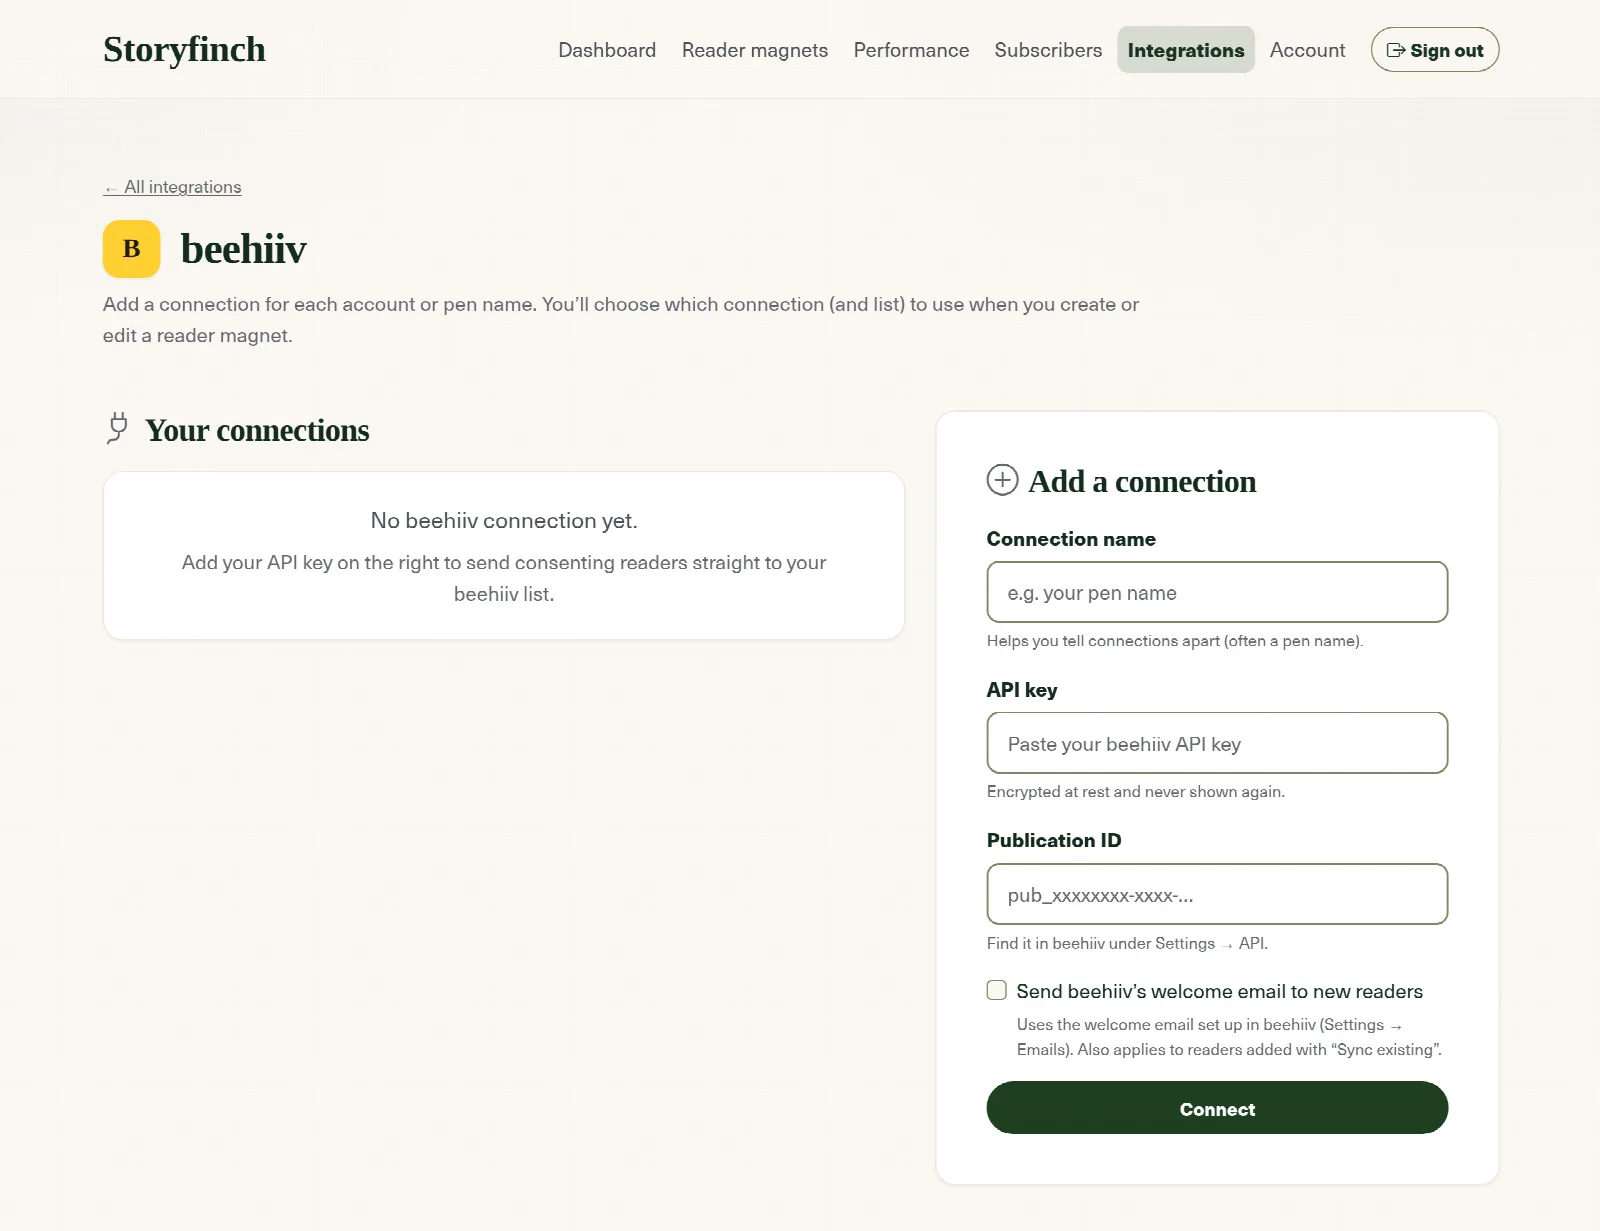
Step 4: Choose beehiiv for your reader magnet
In your reader magnet's settings, under the mailing list options, pick your beehiiv connection. Every reader who signs up and agrees to join your list is then added to your publication. Readers who do not tick the box to join are not sent to beehiiv.
Step 5: Welcome emails and double opt-in
Two beehiiv settings affect what new readers receive:
- beehiiv's welcome email. beehiiv only sends its welcome email to subscribers added by an integration when it is asked to, so Storyfinch gives you the choice. Tick Send beehiiv’s welcome email to new readers on your beehiiv connection, and set up the email itself in beehiiv under Settings → Emails. It is off by default, because readers have already had the book from Storyfinch. You can change it at any time on the connection, without reconnecting.
- Double opt-in. If double opt-in is switched on for your publication, beehiiv sends new readers its own confirmation email, and they stay "pending" (receiving nothing from beehiiv) until they click it. They still get the book from Storyfinch either way. If you want readers to confirm their address, it is usually simpler to switch that on in Storyfinch instead, so they only confirm once. See single vs double opt-in.
For anything longer than one welcome email, use a beehiiv automation. beehiiv's documentation does not say whether its "Signed Up" automation trigger runs for subscribers added through an integration, so test it: sign up on your own Storyfinch page with an address you can check, and confirm that the book arrives from Storyfinch and anything you have set up in beehiiv follows. Our welcome email sequence guide has ideas for what to send.
beehiiv's plans
beehiiv changed its plans on 1 October 2026. The Free plan now covers up to 2,500 subscribers and includes API access, which is all the Storyfinch connection needs. Paid plans (Lite and Pro) add more advanced features. Plans and features change, so check beehiiv's pricing page for what each includes today.
Frequently asked questions
Where do I find my beehiiv publication ID?
Settings → API, in the Publication ID section. It starts with pub_. If you have several publications, use the arrows to choose the right one before copying it.
Do I need a paid beehiiv plan to connect Storyfinch?
No. beehiiv includes API access on its Free plan, though it asks you to verify your identity before switching it on.
How do I send beehiiv's welcome email to new readers?
Tick “Send beehiiv’s welcome email to new readers” on your beehiiv connection in Storyfinch, and make sure the welcome email is set up in beehiiv under Settings → Emails. It is off by default, and you can switch it on or off at any time without reconnecting.
Can I connect more than one beehiiv publication?
Yes. Add one Storyfinch connection per publication, each with its own publication ID, and choose the right one for each reader magnet.
What if beehiiv is down when someone signs up?
The reader still gets their book, and the failed sign-up shows on your Storyfinch dashboard so you can add them later.
Grow your list with your next book
Give readers a free book and turn them into subscribers, with secure delivery and consent built in.
Create your free accountFree plan · No card required · Set up in minutes